Interesting setup using the phone as WiFi hotspot. Although I imagine the combo hotspot + camera + streaming must drain the battery very quickly.
706 2018-07-27 04:00:50
Re: Samsung Galaxy Note 3 as IP Camera (11 replies, posted in Cameras and hardware)
707 2018-07-24 07:38:13
Re: Logitech BRIO 4K Webcam (16 replies, posted in Cameras and hardware)
Thanks for the follow up. No problem ![]()
708 2018-07-23 15:22:37
Re: Logitech BRIO 4K Webcam (16 replies, posted in Cameras and hardware)
Hi,
@purk_7 stated in another thread that the camera settings were reset after every reboot. Does anyone else have the same issue?
This is not expected. The settings should be saved on Kinovea side and re-injected in the camera when reconnecting, but there might be something special with this model and the settings can't be pushed back.
709 2018-07-21 19:27:52
Re: Samsung Galaxy Note 3 as IP Camera (11 replies, posted in Cameras and hardware)
I just tried it for testing and it worked. (Using 0.8.26).
The app I used is "IP Webcam" from Pavel Khlebovich: https://play.google.com/store/apps/deta … p;hl=en_US
When starting the server on the smartphone, it gives the IP address of the stream in the lower part. It is the IP of the phone with the port configured (8080 by default). When connecting to this address in a browser, the phone serves a web page. I clicked Video renderer > Browser button on that web page and got the live stream inside the page.
Then I did right click on that live stream image and "Copy link location", to get the URL of the actual stream, it was indeed http://<ip>:8080/video.
Copying this address in the configuration dialog in Kinovea made it work. I left the stream format to MJPEG in Kinovea and didn't change any defaults in IP Webcam. I did not choose the MKV option in IP Webcam.
Kinovea still has to be set to Capture > General > Display synchronization > "Camera frame". Not "Forced framerate". I haven't investigated further on this point at the moment.
710 2018-07-15 11:18:49
Re: Camera advise - Logitech C922 Problems (10 replies, posted in Cameras and hardware)
The C922 is among the best you can get.
Make sure you are using the most recent Kinovea version even if it's marked experimental, it has many improvements on the capture side.
The framerate and resolution are largely independent but together they define the total bandwidth that the camera has to process and then send over to the computer. The hardware itself is limited by the amount of data it can capture and then the USB link also has a limit to what can be transferred. USB cameras define a set of framerate and resolution combinations that can be selected.
When you go to the camera parameters dialog in Kinovea you will be able to select the stream format, the resolution and framerate. Resolution and framerate option availability depends on the stream format. Set the format to "MJPEG", this way the video will be compressed directly on the camera and the bandwidth to the computer will be much reduced, allowing to choose the top resolution/framerate combo without frame drops.
The PS3Eye has a really low resolution, I wouldn't recommend it in 2018. Some of the Chinese cameras can be interesting but I don't think they have anything above the flagship Logitech if you are looking for top resolution/framerate.
711 2018-07-03 23:01:45
Re: speed measurment 8.26 km/h (1 replies, posted in Bug reports)
You need to add a calibration line somewhere in the video and tell its physical length, so the program knows the mapping between pixels and distance. Add a line and then right click and choose calibrate.
This will work only if the camera is standing still on a tripod.
You can also use the more advanced perspective calibration where you calibrate the dimensions of a rectangle.
712 2018-07-02 09:04:20
Re: Logitech BRIO 4K Webcam (16 replies, posted in Cameras and hardware)
Thanks for testing!
The recording should happen at 120 fps in the sense that all the 120 frames are put into the file per second, however the final video file is marked as 30 fps for replayability purpose. So the final file should look slowed down four times if you play it at 1x speed. This is triggered for any camera feed above 100fps.
There is no setting to change this at the moment. Although you could force it back to 120fps upon reopening by going to Video > Configure video timing > Video framerate.
713 2018-06-10 15:11:46
Re: Measure Min, Max and average angle measurements while pedaling on bike (3 replies, posted in General)
As mentioned there is no automatic extraction of the average, so you will have to settle on eye-balling it from the curves passing at a point or doing the computation by hand or in a spreadsheet. Min and Max can be read on the plot.
I need the angle value when the leg is in 6 oclock
Do you mean when the leg is vertical or when the crank is vertical and the pedal is at the 6 o'clock of the sprokets?
There is a tool for "angle-to-vertical" but unfortunately it is not usable with the angle-angle diagram at the moment.
There might be a simpler way to do this with a custom tool and I'm not an bike fitting expert so please take the following as inspiration only.
If you can show how you normally measure it for a single cycle maybe I can come up with a better solution.
You could add a regular angle tool to act as a reference for when the pedal hits the 6 o'clock mark. Set one of its leg horizontal and the other vertical, with the end of the horizontal leg tracking the pedal or a marker on the foot, aligned with the pedal, and the other two points placed in such a way that the background behind them will not change. This way the angle is always less than 90° when the pedal is up, and 90° when it's at 6 o'clock.
Then add another angle for the knee joint angle.
Something like this:![]()
The blue angle will act as a reference. It will read 90° when the pedal is at 6 o'clock and less than 90° otherwise.
You track these for a while: right click on each angle and do "tracking > start tracking", then progress frame by frame verifying that the auto-tracking is solid and adjust it along the way when necessary, then "tracking > stop tracking" when you are done.
Then go to Tools > angle-angle diagrams, and you should get something like this:

If you look at when the reference angle (X-axis) is at 90°, you can see that the knee angle is around 118 to 120°.
714 2018-06-10 10:51:55
Re: Measure Min, Max and average angle measurements while pedaling on bike (3 replies, posted in General)
Hi,
I would say the angle-angle diagram will be the closest thing to cyclical motion analysis, it lets you see the value of a joint angle in relation to the value of another joint angle. It's used for repeating motion like running, swimming or cycling. Each cycle of motion will appear as an oblong ellipsoid shape from which you can infer information. I guess it depends on whether you can define cycle boundaries in terms of a reference joint angle.
There is no stats done on measurements at the moment, for this you will have to export the data to a spreadsheet and run the computation there.
For reference I repost the angle-angle snapshot in case you haven't seen what they look like.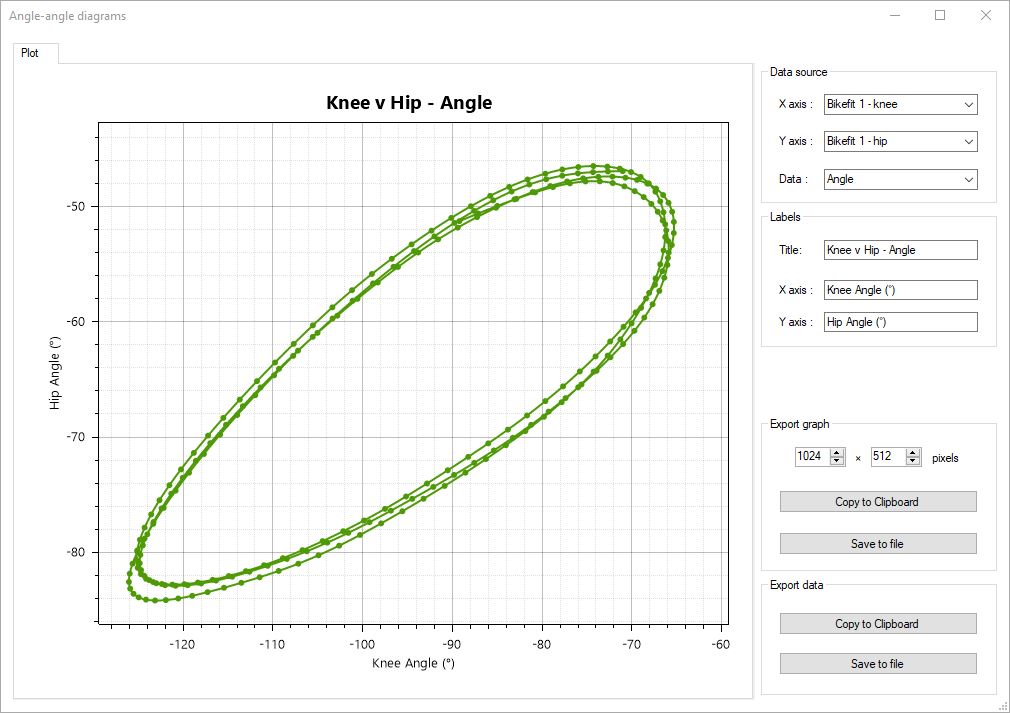
715 2018-05-12 21:08:28
Re: oCam 1CGN-U USB Global Shutter (10 replies, posted in Cameras and hardware)
I have not tried this particular camera but if it is UVC compliant in theory it should work out of the box.
If you try please let us know the outcome.
716 2018-04-25 21:47:05
Re: Maximum Number of Markers/Frame (1 replies, posted in General)
There is no hard limit. I guess it depends on the computer. But it doesn't handle occlusions very well so unless you are tracking things that somehow move on non-crossing path the limiting factor will be the failure of tracking due to something moving in front of the object/joint. If you go frame by frame to verify and adjust when needed it shouldn't be a problem.
717 2018-04-11 14:53:27
Re: disable auto-synchronize (8 replies, posted in Ideas and feature requests)
I agree it's annoying, it has happened to me as well. However I think it's important to have a shortcut for the synchronized playback and using the same shortcut as for the single video case makes sense in my opinion.
The problem is that at the moment there is no distinction between opening two videos for synchronization or just for looking at two videos individually. We need to figure out a heuristic to distinguish these use cases. Maybe keep them independent until the user actually clicks on the synchronization button?
718 2018-03-26 15:30:09
Re: 2 Cameras and HDD on USB-3 Hub (2 replies, posted in Cameras and hardware)
It might work but I'm not 100% sure.
One thing is quite certain I think is that you will need to use an externally powered USB hub, one that will provide the standard 500mA *per port*, rather than a non powered one that will pull 500mA from the PC and share it among its downstream ports. These cameras are relatively power hungry.
If you select the MJPEG stream type in the settings the camera will compress the stream on its side and the bandwidth may be manageable. In this case Kinovea won't recompress it before storing so it's the most streamlined scenario. If the limiting factor is the I/O bandwidth at the drive, another trick would be to set the output files to automatically record one camera to the SSD and the other to the internal HDD.
Two C920 recording to an internal SSD via USB 2.0 works in Kinovea but it's already a scenario that requires the right USB setup.
If you have enough RAM on the laptop another trick could be to setup a RAM drive. It's like having a drive backed up by memory, so lower latency and greater bandwidth. I've never tried that myself but in theory it should give the maximum performances. It will compete with the size of the delay buffer if you want to use the live delay feature though, and you have to remember to copy the files over to your main drive before shutting off otherwise they are lost.
719 2018-03-25 19:18:29
Re: Use actioncam in the capture screen (4 replies, posted in Cameras and hardware)
As far as I'm aware the only way is to send the AV or HDMI out of the camera through a capture box or card on the PC. I don't have a lot of experience with that setup so maybe someone with more experience can chime in.
720 2018-03-25 19:15:38
Topic: Logitech BRIO 4K Webcam (16 replies, posted in Cameras and hardware)
Hi everyone,
Has anyone tested this camera in Kinovea?
It is supposed to do 4096x2160 @ 30 fps, 1920x1080 @ 60 fps and 1280x720 @ 90 fps.
Does it work at all in Kinovea? Is it streaming in MJPEG?