Something like posture grid, postural assessment chart or postural analysis grid chart.
437 2022-04-02 16:09:51
Re: 0.9.5 working with OBS Studio? (3 replies, posted in General)
Hi,
It's not supported at the moment. It's crashing the program for some reason so it's explicitly detected and removed from the list until I figure out where the problem is coming from.
438 2022-03-24 11:59:28
Re: Golf recording (1 replies, posted in General)
Yes it is possible, look into Replay folder observers: https://www.kinovea.org/help/en/capture/replay.html
439 2022-03-18 18:26:22
Re: Saving two video into a composite video result in a distorted video (11 replies, posted in Bug reports)
Yep, I can reproduce the bug, thanks.
edit:
Should be fixed in the next version.
440 2022-03-09 14:57:11
Re: Kinovea para windows 11. (3 replies, posted in Español)
Hola,
Windows 11: No he probado personalmente pero debería funcionar. De que versión de Kinovea estamos hablando? La version 0.9.5 necesita el .NET Framework 4.8, lo cual debería ser instalado por defecto en Windows 11. Pero la versión 0.8.15 utiliza el .NET Framework 3.5 que no está instalado por defecto en las versiones recientes de Windows.
Quizá el problema es especifico a Parallels.
Edit: Ah ok, es porque es un procesador ARM.
441 2022-03-02 17:15:59
Re: Audio triggerd capture - more options and settings (7 replies, posted in Ideas and feature requests)
sam711 wrote:
For me not. As suggested, I would look for that switch between video-recording and save image in the capture\automation tab. Because it just selects what action should happen when the trigger is met.
Yes, I meant the same. I just wanted to say that it won't be a live switch directly in the screen UI (like the arm/disarm button for example), but it will be away in the preferences.
It shall look like this:
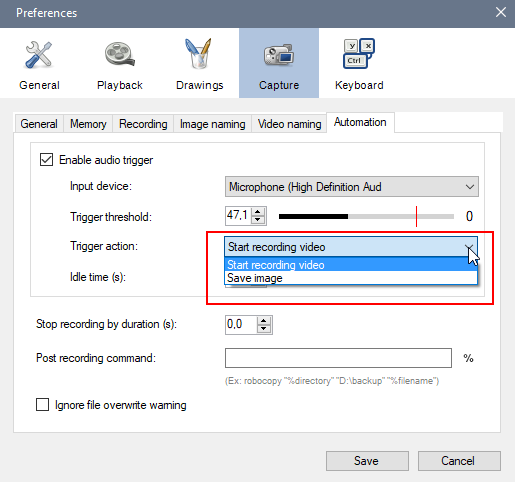
I made it into a list as there might be other actions we could trigger through this mechanism.
442 2022-03-01 10:59:56
Re: Help - re-installation for a dummy...(me) (14 replies, posted in Cameras and hardware)
You can disable compression of captured videos under Preferences > Capture > General > Record uncompressed video. Note that the compression uses pretty aggressive bitrate settings so the image quality difference is not normally perceptible, but the files are 5 to 10 times smaller. Each image is compressed separately. On a side note it can be interesting to disable compression for performance reasons, because the bottleneck during recording is often the compression step.
443 2022-02-27 13:56:51
Re: Help - re-installation for a dummy...(me) (14 replies, posted in Cameras and hardware)
Yes the delay should be saved in the screen descriptor in the workspace. So with the capture screen open: Options > Workspace > Save as default workspace. Then when you re-open Kinovea it should re-create the capture screen, load the camera and set the delay.
444 2022-02-27 13:43:28
Re: Workspace Image Rotation (3 replies, posted in Bug reports)
Invoking a workspace with the -workspace argument or saving it in the preferences via the Options menu should be the same, otherwise there is a bug somewhere… In any case the forced rotation is not saved anywhere so there must be something else going on. Maybe the file itself has the rotation flag enabled?
445 2022-02-16 11:09:28
Re: Workspace Image Rotation (3 replies, posted in Bug reports)
Hi, yes you are correct. Currently there is no way.
This will be fixed in the next version but maybe in a different way than you expect. The image rotation is considered to be part of the video metadata, not the screen configuration, so when you rotate the image it will save this information in the KVA file, and when you re-open the video (from workspace or manually) and the KVA file is reloaded, it will rotate it automatically.
446 2022-02-12 15:14:18
Re: Audio triggerd capture - more options and settings (7 replies, posted in Ideas and feature requests)
I like these suggestions.
For the first one though I think this option would have to go in the general preferences, there is already a lot of stuff going on in the screen UI.
For the last one I don't think I can do anything, the range is a mapping of what the microphone API is providing, so I'm already getting a number between 0..1 that is (log) mapped to the range seen in the user interface. So there is nothing "above" the max number, it's where the mic is clipping.
447 2022-02-12 14:59:11
Re: Remote manual trigger (3 replies, posted in Ideas and feature requests)
You can change the keyboard shortcut under Preferences > Keyboard > CaptureScreen > ToggleRecording.
So you could have a wireless keyboard or numpad and use that maybe.
More advanced ways: using a virtual audio cable (like Voicemeeter Aux Input/Output or Voicemeeter Banana). Then you can have an application trigger this somehow. There is also a Windows Message option that can be triggered using any program that can send Windows messages, like AutoHotKey, but that is not really documented yet, or rather we don't have a neat little example of a program calling this.
Edit: maybe it's also possible to use a contact/piezo microphone with a long wire, it should be possible to make it trigger only when actually touched, not from ambient noise.
448 2022-02-12 14:49:10
Re: Using iPhone as an IP Camera or screen mirror via HDMI? (1 replies, posted in Cameras and hardware)
If the app that makes the iPhone act as an IP camera is serving the stream as MJPEG, then Kinovea can be the client. Go to manual connection, IP camera and fill the details.
For HDMI to USB it must go to USB3 to get enough bandwidth.
449 2021-12-08 19:17:57
Re: Kinovea 0.9.5 (13 replies, posted in General)
Just to say that I reproduce the crash. It's rather low level and I don't have an easy fix for now but I am investigating. Unfortunately it crashes even when the Reincubate Camo application is not launched, since it's the virtual camera driver that is causing the issue in Kinovea. Kinovea tries to contact the camera in the background to prepare the thumbnail, it fails to open it, and upon cleaning the resources there is a low level crash.
450 2021-12-07 21:21:13
Re: Kinovea 0.9.5 (13 replies, posted in General)
Looks to be related to Reincubate Camo, I see this is a webcam application to stream mobile phones, I'll install and try to see what's going on.