Experimental version. As always feedback is very appreciated! 
Beware of regressions and report anything suspicious. Do not assume the issue is known.
Installer: Kinovea.Setup.0.8.23.exe
Portable version: Kinovea.Portable.0.8.23.exe
There are four important aspects to 0.8.23:
A new "portable" version.
Lens distortion correction.
Kinematics plot for trajectories and scatter plot for markers.
Polyline, arrows, and styling improvements.
1. Portable version
The portable version is an autonomous Kinovea that doesn't need to be installed in "Program Files".
When you double click the downloaded executable it will extract itself in a sub-directory of the current directory. You can then copy that new directory wherever you want, on a USB stick for example. To run, locate and start "Kinovea.exe" inside this directory.
This is nice for testing new releases or to carry Kinovea in your pocket.
It uses its own local preferences so you can run it in parallel to the installed ones without interferences.
2. Lens distortion correction
This new feature lets you calibrate your camera's lens distortion. Kinovea will then take that distortion into account for all coordinates and measurements.
This allows the processing of videos filmed with GoPro cameras for example.
There are more information on this feature in this topic, and I'll post a tutorial on how to perform the calibration on the blog in a few days.
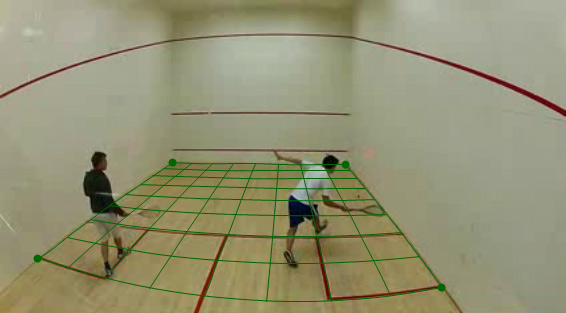
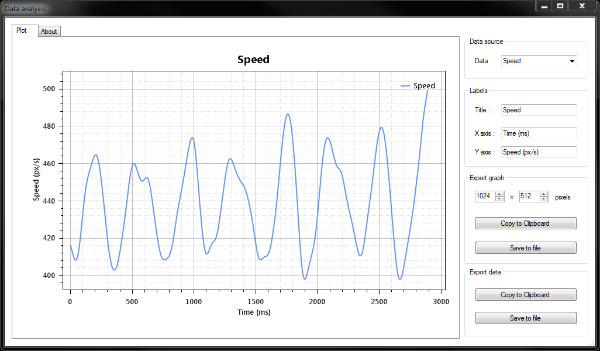
3. Data analysis
A new "Data analysis" menu is available from the trajectory and the point/marker drawing context menus.
This opens a dialog window with plots and data export utilities.
For the Trajectory tool, it creates a time-series plot of a kinematic quantity (position, total distance, velocities, accelerations, etc.) You can change the plot from the "Data source" combo box in the upper right corner. The about tab explains the data filtering algorithms used.
For the marker tool, it creates a scatter plot of all markers added in the video.
Combined with plane calibration, this can be used to map ball impacts, player locations, etc.
Here is a short tennis point with mapped ball impacts.

Both these windows have export options on the right. The save to file option will save a .csv file that you can open back in a spreadsheet application.
You will notice that the values exported do not exactly match the ones exported by the "File > Export to spreadsheet" menu. The latter do not use any filtering and are subject to noise. If you do not intend to perform your own filtering, you should always use the export function from within the data analysis windows.
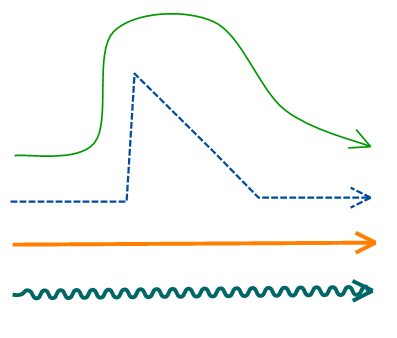
4. Polyline, arrows and color profiles
Several changes related to drawing tools have also been introduced:
Some of the tools that were under the "custom tools" button have been relocated to more appropriate places.
The custom tools can now be individually styled from the color profile dialog.
The new polyline tool lets you draw a series of connected segments.
Several variations of arrow tools are now available under the arrow button.
The raw changelog is here.
Enjoy!